- Installed postfix and sasl2-bin
root@XSHQSHE01:~# apt-get install postfix sasl2-bin
- Copy and edit configuration file for Postfix
root@XSHQSHE01:~# apt-get install postfix sasl2-bin
- Change the configuration file lines as following
- root@mail:~#
- cp /usr/share/postfix/main.cf.dist /etc/postfix/main.cf
- root@mail:~#
- vi /etc/postfix/main.cf
- # line 78 : uncomment
- mail_owner = postfix
- # line 94 : uncomment and specify hostname
- myhostname = mail.srv.world
- # line 102 : uncomment and specify domainname
- mydomain = srv.world
- # line 123 : uncomment
- myorigin = $mydomain
- # line 137 : uncomment
- inet_interfaces = all
- # line 185 : uncomment
- mydestination = $myhostname, localhost.$mydomain, localhost, $mydomain
- # line 228 : uncomment
- local_recipient_maps = unix:passwd.byname $alias_maps
- # line 270 : uncomment
- mynetworks_style = subnet
- # line 287 : add your local network
- mynetworks = 127.0.0.0/8, 10.0.0.0/24
- # line 407 : uncomment
- alias_maps = hash:/etc/aliases
- # line 418 : uncomment
- alias_database = hash:/etc/aliases
- # line 440 : uncomment
- home_mailbox = Maildir/
- # line 576: comment out and add
- #smtpd_banner = $myhostname ESMTP $mail_name (Debian/GNU)
- smtpd_banner = $myhostname ESMTP
- # line 650 : add
- sendmail_path = /usr/sbin/postfix
- # line 655 : add
- newaliases_path = /usr/bin/newaliases
- # line 660 : add
- mailq_path = /usr/bin/mailq
- # line 666 : add
- setgid_group = postdrop
- # line 670 : add
- #html_directory =
- # line 674 : comment out
- #manpage_directory =
- # line 679 : comment out
- #sample_directory =
- # line 683 : comment out
- #readme_directory =
- # line 684 : if also listen IPv6, change to [all]
- inet_protocols = ipv4
- # add follows to the end
- # disable SMTP VRFY command
- disable_vrfy_command = yes
- # require HELO command to sender hosts
- smtpd_helo_required = yes
- # limit an email size
- # example below means 10M bytes limit
- message_size_limit = 10240000
- # SMTP-Auth settings
- smtpd_sasl_type = dovecot
- smtpd_sasl_path = private/auth
- smtpd_sasl_auth_enable = yes
- smtpd_sasl_security_options = noanonymous
- smtpd_sasl_local_domain = $myhostname
- smtpd_recipient_restrictions = permit_mynetworks, permit_auth_destination, permit_sasl_authenticated, reject
- Restart postfix
root@XSHQSHE01:~# newaliases
root@XSHQSHE01:~# systemctl restart postfix
- Configure additional settings for Postfix if you need.It’s possible to reject many spam emails with the settings below.
However, you should consider to apply the settings,
because sometimes normal emails are also rejected with them.
Especially, there are SMTP servers that forward lookup and reverse lookup of their hostnames on DNS do not match even if they are not spammers.
| root@mail:~# vi /etc/postfix/main.cf # add to the end # reject unknown clients that forward lookup and reverse lookup of their hostnames on DNS do not match smtpd_client_restrictions = permit_mynetworks, reject_unknown_client_hostname, permit # rejects senders that domain name set in FROM are not registered in DNS or # not registered with FQDN smtpd_sender_restrictions = permit_mynetworks, reject_unknown_sender_domain, reject_non_fqdn_sender # reject hosts that domain name set in FROM are not registered in DNS or # not registered with FQDN when your SMTP server receives HELO command smtpd_helo_restrictions = permit_mynetworks, reject_unknown_hostname, reject_non_fqdn_hostname, reject_invalid_hostname, permit root@mail:~# systemctl restart postfix |
- Install Dovecot and configuration
root@XSHQSHE01:~# apt -y install dovecot-core dovecot-pop3d dovecot-imapd
| root@mail:~# apt -y install dovecot-core dovecot-pop3d dovecot-imapd root@mail:~# vi /etc/dovecot/dovecot.conf # line 30 : uncomment listen = *, :: root@mail:~# vi /etc/dovecot/conf.d/10-auth.conf # line 10 : uncomment and change (allow plain text auth) disable_plaintext_auth = no # line 100 : add auth_mechanisms = plain login root@mail:~# vi /etc/dovecot/conf.d/10-mail.conf # line 30 : change to Maildir mail_location = maildir:~/Maildir root@mail:~# vi /etc/dovecot/conf.d/10-master.conf # line 107-109 : uncomment and add # Postfix smtp-auth unix_listener /var/spool/postfix/private/auth { mode = 0666 user = postfix group = postfix } root@mail:~# systemctl restart dovecot |
- Restart dovecot
root@XSHQSHE01:~# systemctl restart dovecot
- Install mailutils and add mail users
root@XSHQSHE01:~# apt-get install mailutils
root@XSHQSHE01:~# echo ‘export MAIL=$HOME/Maildir/’ >> /etc/profile.d/mail.sh
root@XSHQSHE01:~# adduser klaus.xie –force-badname
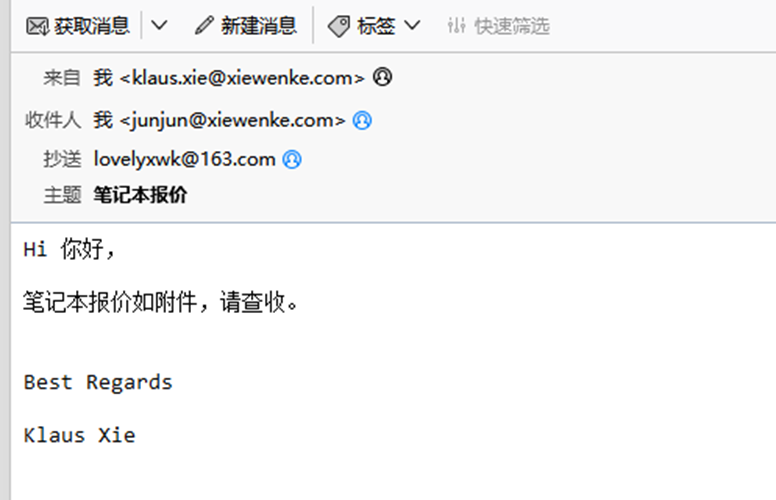
- Test mail sent
root@XSHQSHE01:~# mail klaus.xie@xiewenke.com
Cc:
Subject: Test mail
This is my first mail.
root@XSHQSHE01:~#
root@XSHQSHE01:~# cd /home/klaus.xie/Maildir/
root@XSHQSHE01:/home/klaus.xie/Maildir# ls
cur new tmp
root@XSHQSHE01:/home/klaus.xie/Maildir# cd new/
root@XSHQSHE01:/home/klaus.xie/Maildir/new# ls
1672673186.Vfc01Ifd544M920597.XSHQSHE01
root@XSHQSHE01:/home/klaus.xie/Maildir/new# cat 1672673186.Vfc01Ifd544M920597.XSHQSHE01
Return-Path: <root@XSHQSHE01>
X-Original-To: klaus.xie@xiewenke.com
Delivered-To: klaus.xie@xiewenke.com
Received: by mail.xiewenke.com (Postfix, from userid 0)
id DBED4FD541; Mon, 2 Jan 2023 16:26:26 +0100 (CET)
To: <klaus.xie@xiewenke.com>
Subject: Test mail
User-Agent: mail (GNU Mailutils 3.14)
Date: Mon, 2 Jan 2023 16:26:26 +0100
Message-Id: <20230102152626.DBED4FD541@mail.xiewenke.com>
From: root <root@XSHQSHE01>
This is my first mail.
root@XSHQSHE01:/home/klaus.xie/Maildir/new#
- Install mail client with Mozilla Thunderbird

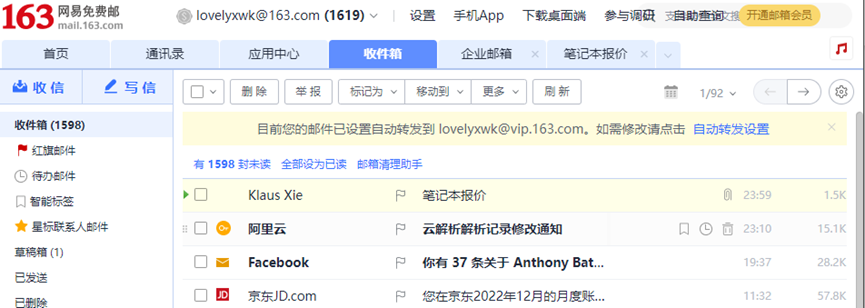
Roundcube is the webmail server that you’ll be using to manage emails on your server, it has a simple web interface to do the job, it can be customized by installing more modules & themes.
root@XSHQSHE01:~# wget https://github.com/roundcube/roundcubemail/releases/download/1.6.1/roundcubemail-1.6.1.tar.gz
root@XSHQSHE01:~# tar -xzf roundcubemail-1.6.1.tar.gz
root@XSHQSHE01:~# mv roundcubemail-1.6.1 /var/www/html/roundcubemail
root@XSHQSHE01:/var/www/html# chown www-data:www-data /var/www/html/roundcubemail/
root@XSHQSHE01:/var/www/html# chmod -R 755 /var/www/html/roundcubemail/
Next, you need to create a new database and user for Roundcube and grant all permission to a new user to write to the database.
$ sudo mysql -u root
MariaDB [(none)]> CREATE DATABASE roundcube DEFAULT CHARACTER SET utf8 COLLATE utf8_general_ci;
MariaDB [(none)]> CREATE USER roundcubeuser@localhost IDENTIFIED BY 'password';
MariaDB [(none)]> GRANT ALL PRIVILEGES ON roundcube.* TO roundcubeuser@localhost;
MariaDB [(none)]> flush privileges;
MariaDB [(none)]> quit;

Next, import the initial tables to the Roundcube database.

$ sudo mysql roundcube < /var/www/html/roundcubemail/SQL/mysql.initial.sql

Create an Apache Virtual Host for Roundcube Webmail
Create an apache virtual host for Roundcube webmail.

$ sudo nano /etc/apache2/sites-available/roundcube.conf
Add the following configuration in it.

<VirtualHost *:80>
  ServerName tecmint.com
  DocumentRoot /var/www/html/roundcubemail/

  ErrorLog ${APACHE_LOG_DIR}/roundcube_error.log
  CustomLog ${APACHE_LOG_DIR}/roundcube_access.log combined

  <Directory />
    Options FollowSymLinks
    AllowOverride All
  </Directory>

  <Directory /var/www/html/roundcubemail/>
    Options FollowSymLinks MultiViews
    AllowOverride All
    Order allow,deny
    allow from all
  </Directory>

</VirtualHost>

freestar

Next, enable this virtual host and reload the apache for the changes.

$ sudo a2ensite roundcube.conf
$ sudo systemctl reload apache2

You can now access the webmail by going to http://yourdomain.com/installer/.
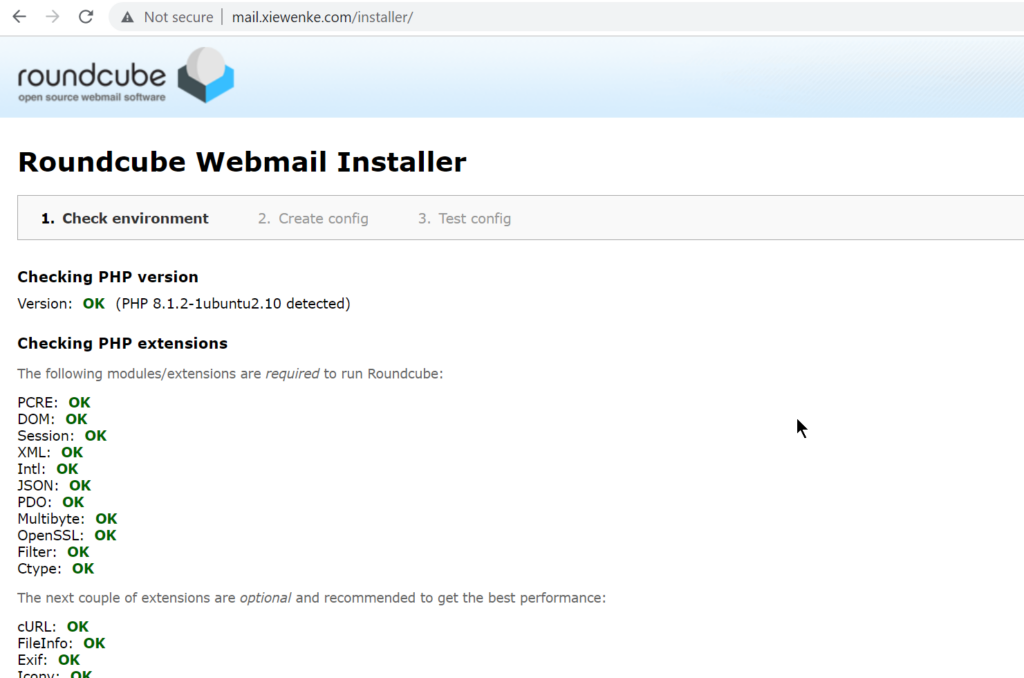
Login OK, before logging in need to add an account for RoundCube.
root@XSHQSHE01:~# add user webmail

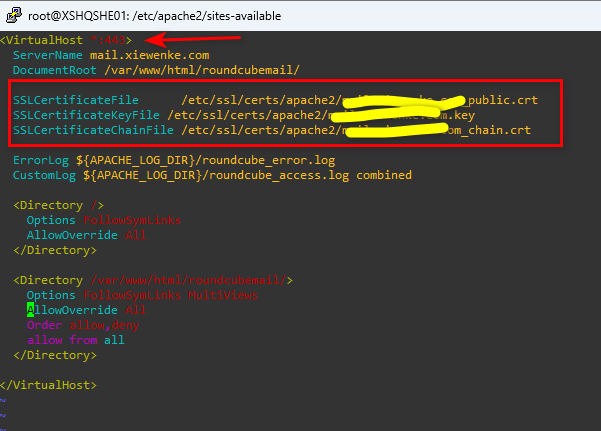
Enable SSL for RoundCube, Download the apache certificate from Aliyun for Apache.

Uploaded it to the mail server

Revise the conf file as below, and enable the SSL module for Apache
root@XSHQSHE01:/etc/apache2/sites-available# vim roundcube.conf
root@XSHQSHE01:~# a2enmod ssl
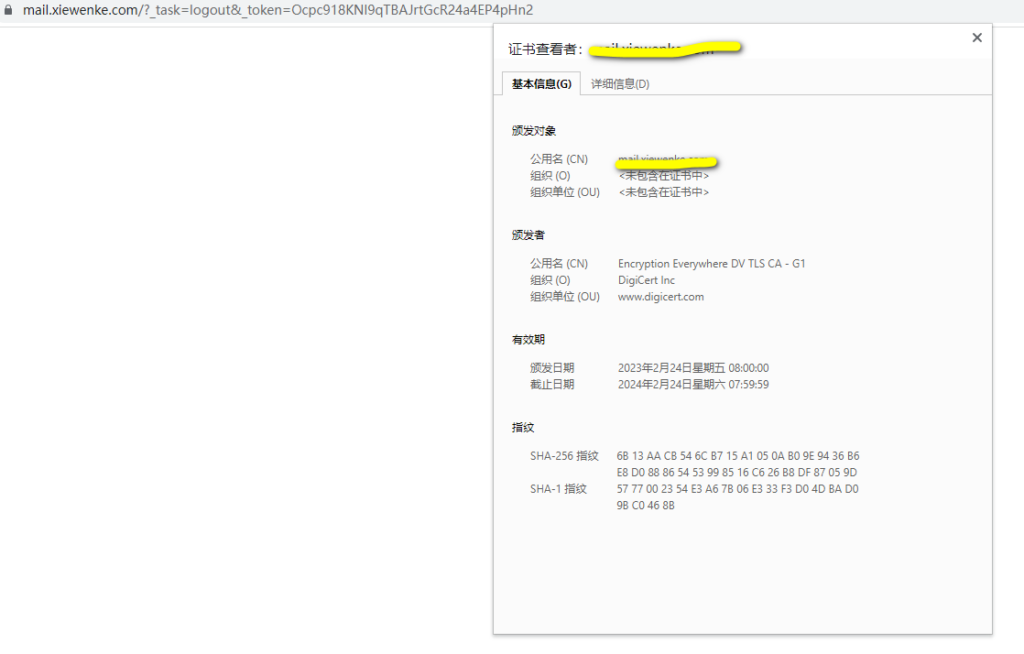
Checked the HTTPS valid
Install and configure Postfixadmin
Download Postfixadmin via wget
root@XSHQSHE01:/var/www/html# wget https://github.com/postfixadmin/postfixadmin/archive/refs/tags/postfixadmin-3.3.13.tar.gz
root@XSHQSHE01:/var/www/html# tar xzvf postfixadmin-3.3.13.tar.gz
root@XSHQSHE01:/var/www/html# mv postfixadmin-postfixadmin-3.3.13 postfixadmin
root@XSHQSHE01:/var/www/html# chown -R www-data:www-data postfixadmin
root@XSHQSHE01:/var/www/html# chmod -R 755 postfixadmin
Create a Database and User for PostfixAdmin
Log into MySQL/MariaDB shell as root with the following command.
sudo mysql -u root
Once you are logged in, create a database for PostfixAdmin using the following command. I named it postfixadmin, but you can use whatever name you like. (Don’t leave out the semicolon.)
create database postfixadmin;
Then enter the command below to create a database user for PostfixAdmin. Replace postfixadmin_password with your preferred password. Note that the password should not contain the # character, or you might not be able to log in later.
create user 'postfixadmin'@'localhost' identified by 'postfixadmin_password';
Grants all privileges of postfixadmin database to the user.
grant all privileges on postfixadmin.* to 'postfixadmin'@'localhost';
Flush the privileges table for the changes to take effect and then get out of MariaDB shell.
flush privileges; exit;
Configure PostfixAdmin
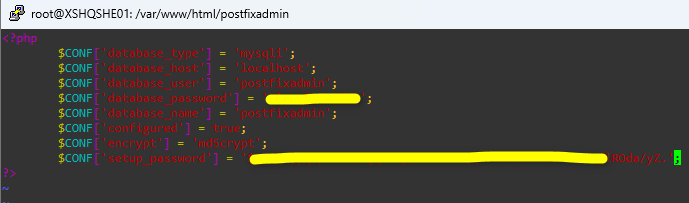
The default PostfixAdmin configuration file is config.inc.php. We need to create a config.local.php file and add custom configurations.
root@XSHQSHE01:/var/www/html/postfixadmin# touch config.local.php
Add the following lines in the file, so PostfixAdmin can connect to MySQL/MariaDB database. Replace postfixadmin_password with the real PostfixAdmin password created
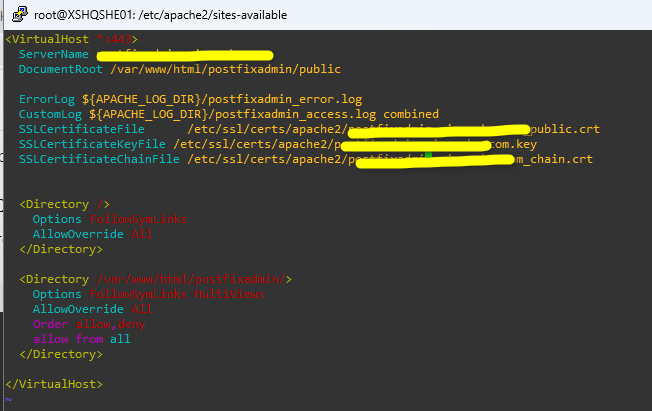
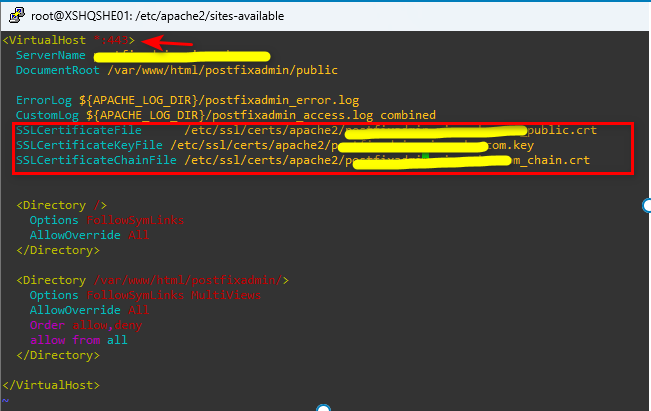
Create Apache Virtual Host
root@XSHQSHE01:/etc/apache2/sites-available# touch postfixadmin.conf
root@XSHQSHE01:/etc/apache2/sites-available# a2ensite postfixadmin.conf
root@XSHQSHE01:/etc/apache2/sites-available# systemctl restart apache2
Enable Statistics in Dovecot
PostfixAdmin needs to read Dovecot statistics. Edit the Dovecot configuration file.
sudo nano /etc/dovecot/conf.d/10-master.conf
Add the following lines to the end of this file.
service stats {
    unix_listener stats-reader {
    user = www-data
    group = www-data
    mode = 0660
}

unix_listener stats-writer {
    user = www-data
    group = www-data
    mode = 0660
  }
}
Save and close the file. Then add the web server to the dovecot group.
sudo gpasswd -a www-data dovecot
Restart Dovecot.
sudo systemctl restart dovecot
Grant permissions to the www-data user.
root@XSHQSHE01:~# chown -R www-data:www-data /var/run/dovecot/stats-writer root@XSHQSHE01:~# chown -R www-data:www-data /var/run/dovecot/stats-reader
Enabling HTTPS
Download the apache certificate from Aliyun for Apache.

Revise the configuration file for apache virtual host to enable SSL
root@XSHQSHE01:~# a2enmod ssl
Check the SSL valid

Disable SSL moudule for apache:
root@XSHQSHE01:/etc/apache2# a2dismod ssl


Refrence article: https://www.linuxbabe.com/mail-server/postfixadmin-ubuntu